State machines are a powerful tool for creating reliable firmware, but they often have a reputation for being cumbersome and difficult to debug. However, with the Rust language, implementing state machines can be a painless and reliable process. In this post, we’ll explore how to use state machines in Rust and show how the language’s advanced features make it an ideal choice for building robust firmware. We’ll also delve into some advanced techniques for state machine implementation that can take your code to the next level.
Firmware running in an embedded application generally has to meet higher standards than a typical desktop application. Especially if your product
For this blog let’s use a 3D printer as an example. This is a typical application where reliability and robustness is important because it is usually working unattended for an extended time.
A big part of creating reliable firmware is ensuring we can’t accidentally reach an unexpected state. A 3D printer needs to control a set of actuators. Therefore, as an example, I have written the (simplified) motor driver below. There are just two properties: a target_position and a flag target_reached to indicate the position is reached.
This driver has a very simple interface. You give it a desired position using set_target_pos. Then you repeatedly poll update() until the motor (or some sensor) gives the signal that the target has been reached.
|
Note that this code is a bit fragile: target_position and target_reached must always be updated together. Forget to update target_reached, and the driver is stuck in a state where the position is never applied!
What has happened is that we have accidentally created an implicit state machine with poorly defined states. Lets rewrite update() a bit to expose those states using Rust match syntax:
|
This already looks more like a state machine, doesn’t it? The code does exactly the same as before, but now it’s clear that some state combinations are not really meaningful. For example getting the target reached signal without a target being set. That shouldn’t happen.
Of course you can write your code in such a way that thse ‘illegal’ states are never reached. But it would be nice to let the compiler help us with that.
Continuing on the previous example, let’s make the states more explicit. We can replace the individual properties in the MotorDriver struct with an enum.
|
Now we only have three states instead of four: the implicit ‘illegal’ state can no longer be expressed: The compiler will guarantee that the motor is always either Idle, Moving, or PositionReached!
The implementation will now look like this:
|
To me, this is much nicer than the code we started with: the states are clearly described and the implementation of set_target_pos cannot accidentally cause us to end up in an invalid state.
Reliability
State machines are a valuable tool to create highly reliable firmware. By eliminating unexpected states, you can be confident about what your software will do: all scenarios are explicitly described!
You probably already use one anyways
If you try to avoid implementing a state machine, you may up with an implicit state machine as we have just seen: you might as well convert it to a proper one!
A joy to implement in Rust
The Rust language is very suitable for implementing state machines. Its match' statement is much more powerful than for example switch` in C/C++, and both states and even state transitions can be fully validated at compile-time.
So far we have only just touched the surface of the possibilities Rust gives us to write robust state machines. The rest of this blog post will show some more advanced techniques that we often use.
At least as important as the states themselves are the transitions between them. Especially for larger state machines it may become hard to track which state transitions are (supposed to be) possible. That is why we also want to explicitely define and constrain the state transitions. We do this based on events that can occur.

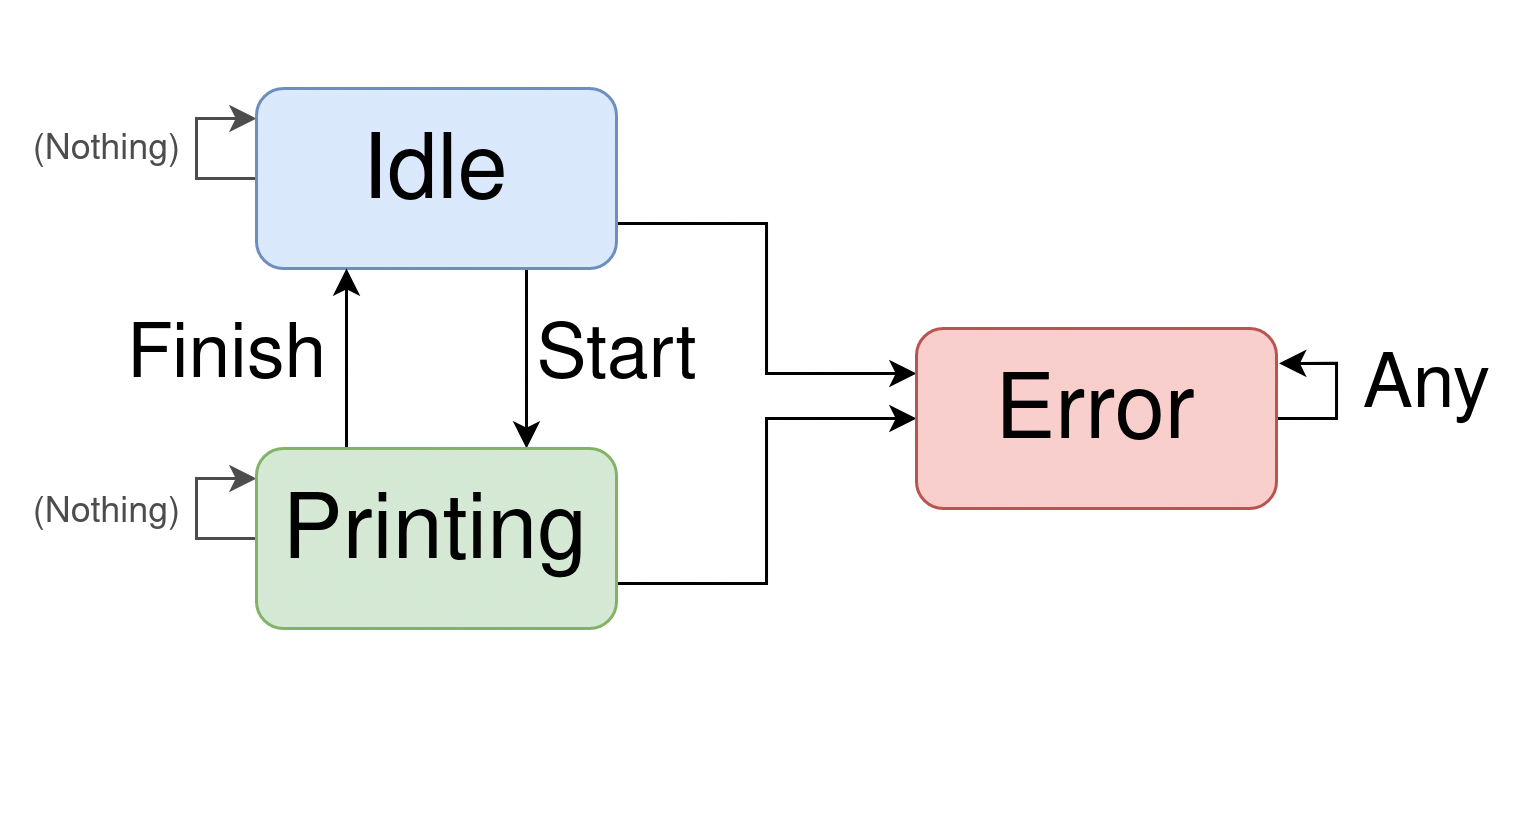
In this example, we show what a simple top level state machine for the 3D printer might look like. The graph shows one arrow for each possible event. For example, only the Start event can get the printer from Idle state to Printing.
Let’s model this in Rust:
|
Now we can design the usual state machine by matching on the State and setting the new state. But if we directly manipulate the state everywhere, how do we prevent accidentally making an unwanted state transition? This is where the events come in:
|
Instead of directly manipulating the State, your code can return an Event that describes a reason for updating the state. The code emitting the Event can be completely separate from the state machine and does not even have to know about state transitions. State updates can be centralized in one place as shown below:
|
Rust proves at compile time that all combinations are covered, even if you use wildcard matches: no runtime surprises! You just have to remember not to mutate the state anywhere else except in this next() function.
Admittedly, this can become quite a long, boring list. Especially with larger state machines. But at least it is easy to verify.
Rust allows us to go one step further: its strict type system can be used to lock down the possible state transitions at compile-time.
This pattern is sometimes referred to as the TypeState Pattern (you may have used it if you are familiar with the Builder pattern).
|
Note that in this code example, a Printer instance can only be constructed through an IdlePrinter.
If you try to manually construct a Printer struct, the compiler won’t allow you: its _dummy property is private!
If we use these structs in a state machine, the compiler effectively guarantees that transitions from Error to Printing are impossible:
|
Note that next() consumes self and returns a new instance.
Only State::Idle has an IdlePrinter instance that can create a Printer which is necessary to enter State::Printing.
Once State::Error is reached, there is no printer instance anymore: transitions to the Idle and Printing state are therefore impossible!
Of course the TypeState and Event patterns can even be combined if you want:
|
This complexity is usually only worth it for larger or very critical state machines.
In this blog post, we explored the benefits and techniques of using Rust to implement state machines for embedded systems. Rust’s powerful type system and match statements provide a solid foundation for developing reliable, robust firmware with well-defined states and transitions.
If you have read this far, I hope to have convinced you that state machines don’t have to be scary. Rust is very suitable for this task: knowing the compiler has your back makes it quite satisfying.
Does this mean that I always use a TypeState-based state machine? No. Often an enum + match statement will do the job. In the end, it is a trade-off: which pattern best suits your application?
If you have any questions about this topic, feel free to contact us at rust@jitter.company.